
Peri-implantitis Doesn't Hurt: Seeing Peri-Implant Biofilm for Lifelong Implant Maintenance
Peri-implantitis rarely announces itself. You see a patient at recall, ask how the implant in the lower left is doing, and get the answer you always get: "Fine. Doesn't bother me at all." Meanwhile the tissue around that fixture may be telling a different story. No pain means the patient has no reason to change anything at home — and your team has very little to point at when you explain why it matters.
This post covers why peri-implant disease stays quiet, what peri-implant biofilm looks like under Qray fluorescence, and how to turn that image into an implant maintenance routine your whole team can run. If you are new to the science, start with Quantitative Light-Induced Fluorescence: What 405 nm Shows.
Why doesn't peri-implantitis hurt?
Peri-implant disease often progresses with no pain signal at all. It is common to examine an implant — placed in your own practice or elsewhere — that has peri-implantitis while the patient reports no discomfort at all. It is a quiet process going on in the mouth. By the time bone breakdown or tissue inflammation is visible, the conversation has often already shifted to whether the implant can be maintained or treated.
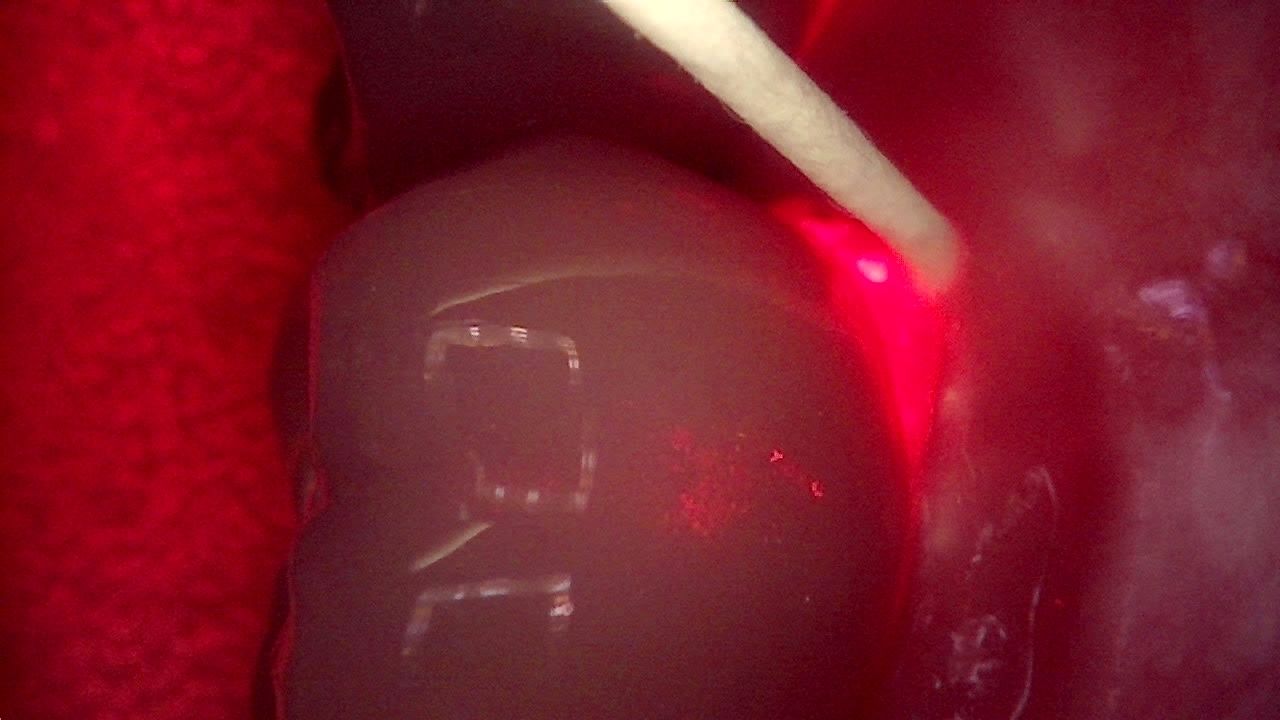
The same pattern shows up in Korean practices. In one clinical case, red fluorescence began to appear around an implant crown and the surrounding gingiva at a routine recall. When a paper point was inserted, red exudate came out of the peri-implant pocket. The patient had no symptoms, yet the findings suggested peri-implantitis was actively progressing.
Implants are simply harder to keep clean than natural teeth. Threads and a deliberately roughened surface — designed to help osseointegration — give biofilm places to hide that a toothbrush or floss cannot reach. That is the case for looking before symptoms show up.
What does peri-implant biofilm look like under fluorescence?
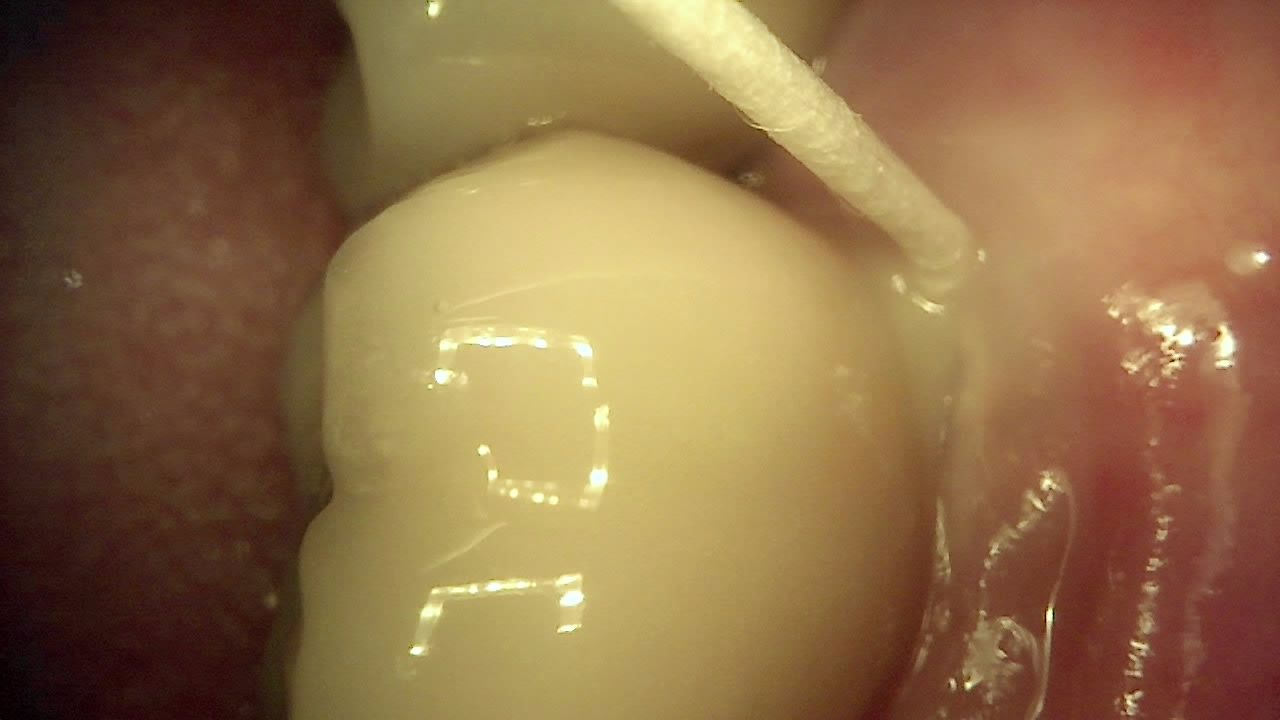
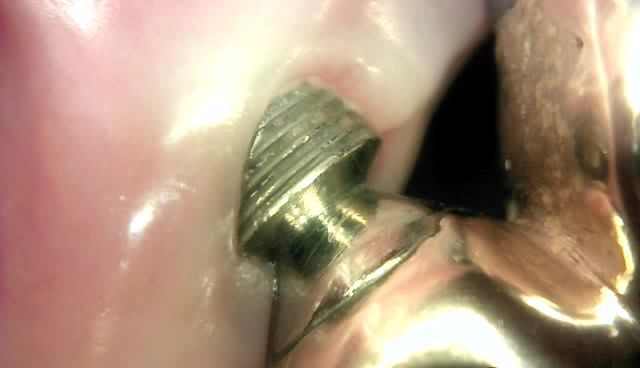
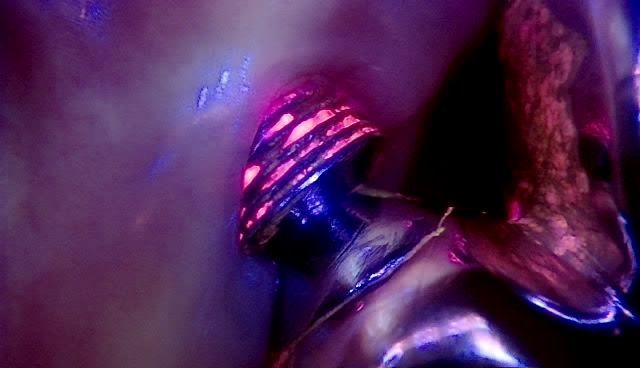
Biofilm does not stop at the tooth. Once it matures around an implant, it fluoresces red just as it does on enamel. When pathogenic biofilm colonizes the peri-implant area, it can show up red even on exposed threads. Red biofilm fluorescence is often visible on fixtures with peri-implantitis, and a paper point inserted into an inflamed pocket may pick up red fluorescence clearly.
The observation goes back to a published case report (Ku et al., Implant Dent 2016). The authors imaged the surfaces of four removed implants with QLF-D. The two removed because of peri-implantitis, both with severe bone loss, showed red fluorescence from the abutment margin down toward the apex; the two with clean surfaces showed none. The authors interpreted red fluorescence as a sign of bacterial contamination and suggested it first appears near the implant crown before moving apically. They also proposed that showing patients the red fluorescence could encourage better self-care. With four cases, read this as evidence of mechanism, not as a diagnostic accuracy figure — the authors themselves call for larger clinical studies.
| Around the same implant | Under white light | Under 405 nm fluorescence |
|---|---|---|
| Crown margin and gingiva | Plaque looks thin or barely visible | Mature biofilm collects as a red signal |
| Exposed threads | Metallic shine; plaque is hard to tell apart | Red fluorescence tracks along the threads |
| Paper point in the sulcus | White point, little to see | Red where it contacts the pocket |
Qray fluorescence does not replace your radiographs or your probe. Radiographs show bone levels and bone loss; probing shows depth and bleeding. It adds one more layer — where mature biofilm is sitting right now — and the diagnosis stays with the dentist, who reads all of it together.
A real case: same implant, more information
The crown margin looks calm under white light. Under Qray fluorescence, it doesn't. This case shows the same site, with a paper point placed at the implant crown margin, captured in white light and then in Qray fluorescence.
Where threads are exposed, the difference is even clearer. What reads as bare metal under white light shows red along the threads under Qray fluorescence.
Is the goal to remove every bacterium?
The goal of implant maintenance is balance, not sterility. Healthy biofilm can be compared to a rainforest: diverse plants and wildlife supporting each other, keeping any one species from taking over, with a low inflammatory response. Let control slip and it is like an invasive species moving in — the balance tips into dysbiosis, and chronic inflammation and tissue destruction follow.
That is why red works as a traffic light, not an alarm. Red fluorescence comes from biofilm that has been left in place long enough to mature; balanced early biofilm does not glow red. A red area simply shows you where to start managing together.
How do you build implant maintenance into the schedule?
Start with a baseline image for every implant patient — healthy or not. Capture images whether the implant looks healthy or diseased. If something changes down the road, you have a before and after. If things improve, you can show that too, and those early wins keep patients engaged.
Read Qray fluorescence alongside your other findings and sort by level of concern. Here is one workflow a practice can use, in table form:
| What you see together | Next step in the practice |
|---|---|
| Little red, other findings stable | Monitor and recapture under the same conditions at the next recall |
| Red present, area needs attention | Debride, adjust home care, shorten the recall and re-image to compare |
| Widespread red plus bleeding, suppuration, deepening pockets or bony changes | Dentist reviews a treatment plan, which may include surgical care or referral |
Replace "clean better around your implant" with a visible target. Point to the red area on the screen, ask the patient to focus on exactly that spot, then re-image in a few weeks to see whether it improved. Nobody blames the patient and nobody takes the blame — it becomes a partnership.
Split the work across the team and chair time barely moves. Hygienists capture the implant sites during the cleaning, so the images are ready when the doctor walks in. The front desk books the next visit "to protect your implants," not just "for your six-month cleaning." Use Qraycam Pro for the overview and Qraypen C for a close look at the implant margin, then recheck with Qray fluorescence after debridement. After cleaning an implant surface, there is otherwise little way to know whether the biofilm is really gone. Device roles are covered in Qray Intraoral Camera Lineup: Which Device, When?
What's next
Placing the implant is the start of care, not the end. Patients who have had implants need to be managed across their whole life course. The peri-implant Qray fluorescence images you capture today are recorded in LINKDENS and shared with the patient as a report. At the next visit, you capture the same site under the same conditions and compare whether the red has receded. Recall stops being "the cleaning appointment" and becomes "the visit that protects your implant." For a practice owner, that is how a one-time surgical relationship turns into ongoing care — and when it continues through QBLISScare, the implant becomes part of lifelong care.
FAQ
Q. Can Qray fluorescence images alone diagnose peri-implantitis?
A. No. Qray fluorescence shows mature peri-implant biofilm. Whether it is peri-implantitis is the dentist's call, based on probing depth, bleeding or suppuration, and radiographic bone changes.
Q. Should I image implants that look healthy?
A. Yes. A baseline image is what makes later comparison and explanation possible — and showing improvement is one of the best motivators for home care.
Q. Does red peri-implant biofilm mean surgery?
A. Not necessarily. Red is a signal to start managing together. Depending on extent and other findings, you may begin with debridement, home-care changes and a shorter recall. Treatment decisions stay with the dentist.
References
- Ku HM, Jun MK, Kim JH, et al. Explaining the red fluorescence evident on the surface of failed dental implants: case reports. Implant Dent. 2016;25(3):445–449. DOI