
Dental Case Acceptance Starts With What Patients See
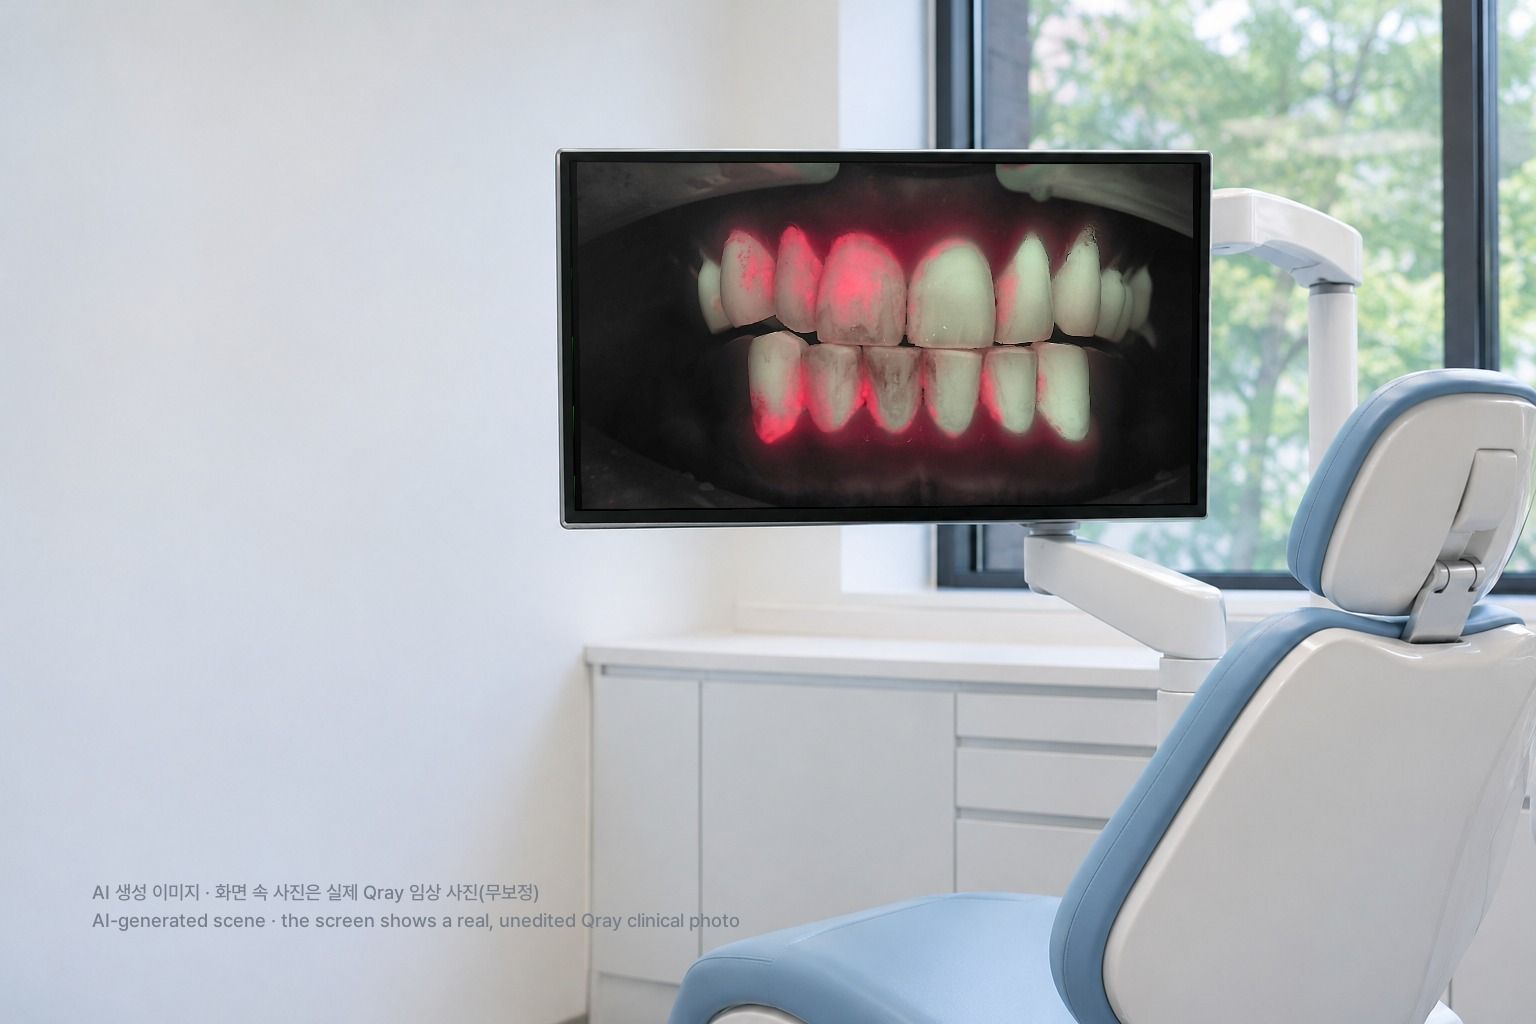
Dental case acceptance is where good diagnosis often stalls. You have seen it: an asymptomatic recall patient, a lesion you are confident about, a clear recommendation. "We found a cavity here and we should treat it." The patient tilts their head. "But it doesn't hurt." Your clinical judgment was sound and your explanation was accurate, yet the conversation ends there. This article walks through a different sequence for the same findings, called The QBLISS Consultation Engine, and shows how each step plays out chairside.
Why do patients hesitate even when the explanation is correct?
Patients are not rejecting the treatment. They are rejecting what they cannot understand. The clinician has the training and the radiographs. The patient has never seen the inside of their own mouth. Spending time and money on a future risk you cannot see is hard for anyone. Traditional case presentation begins with "I found a problem." Patient education built on storytelling begins with "Let's look at this together."
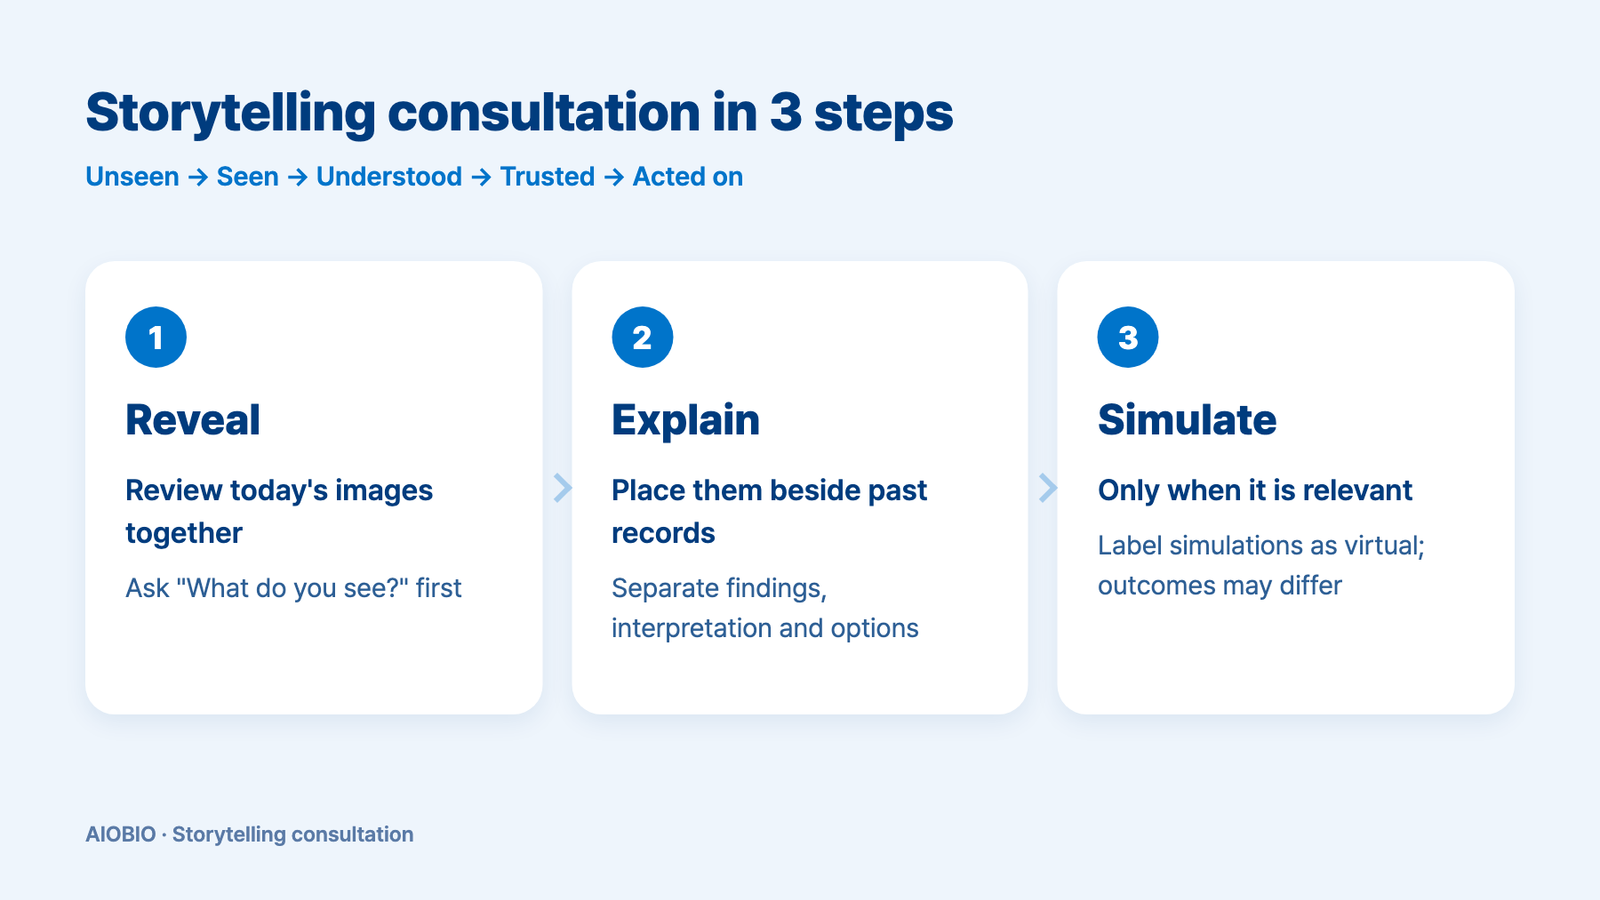
The path runs from unseen to seen, to understood, to trusted, to acted on. Showing one image is not enough. A patient needs to understand why you are looking at this spot, what can be done, and what you will check next time before they can take part in their own care. The storytelling method connects the patient's current condition, past records, observed change, and possible meaning and options into one continuous story.
If you are looking for a script to lift acceptance numbers, one point first. This method makes no promise about acceptance. Whether a patient accepts treatment also depends on cost, personal preference and clinical conditions. What the storytelling method changes is the experience: the patient chooses with an understanding of their own condition.
| Step | What the clinician does | What the patient hears | Material used |
|---|---|---|---|
| 1. Reveal | Reviews the observed condition on screen together with the patient | "Here is the area we want to look at today." | Today's white light and Qray fluorescence images |
| 2. Explain | Compares with prior records and explains possible causes and options in clinical context | "Let's look at what has changed since last time and what we should manage." | Prior images taken under the same conditions, radiographs and other findings |
| 3. Simulate | When relevant, presents a projected appearance and options as a reference for discussion | "Let's use this image as a starting point to talk through what's possible." | Insight Smile projected image, clearly labeled as virtual |
Step 1, Reveal: what do you show first, and how?
Let the patient see their own mouth before you deliver a verdict. To a patient, the grooves in a white light intraoral photo usually mean very little. Image the same surface under Qray fluorescence and you may see red fluorescence in fissures the toothbrush bristles cannot reach, or along the gingival margin. Red fluorescence is associated with mature biofilm, and it is the moment a patient tends to ask, "What is that?"
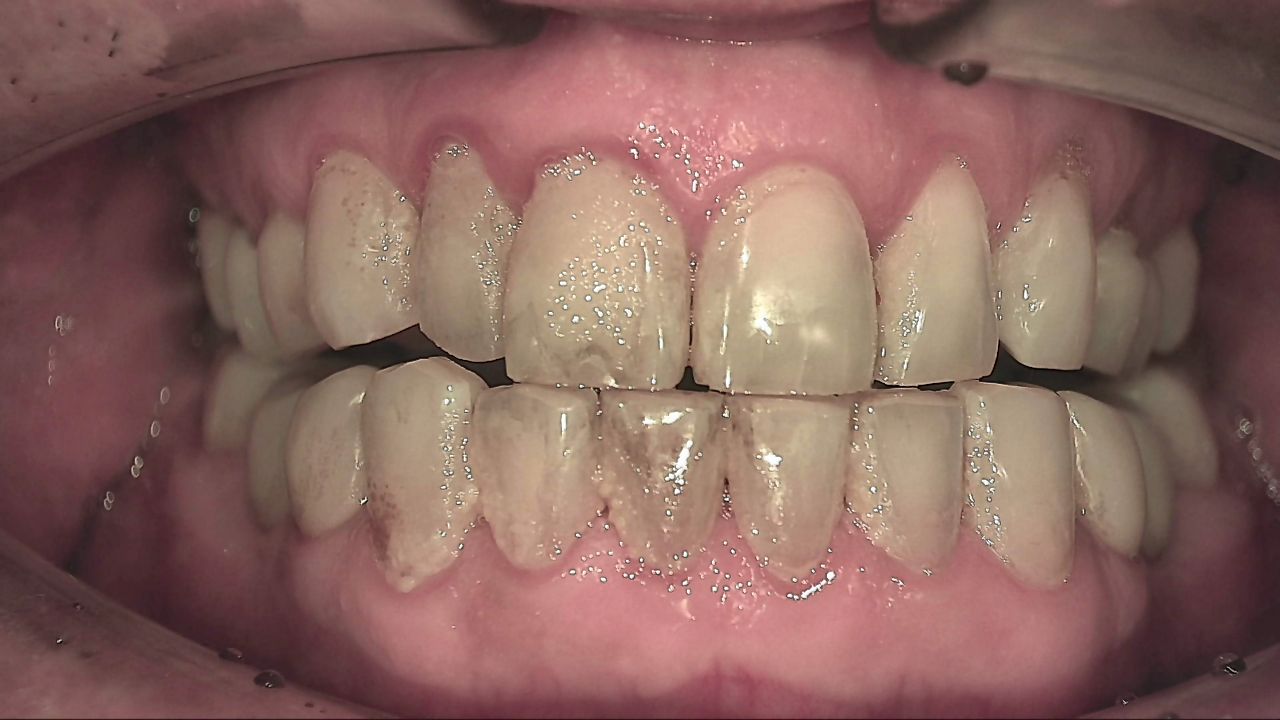
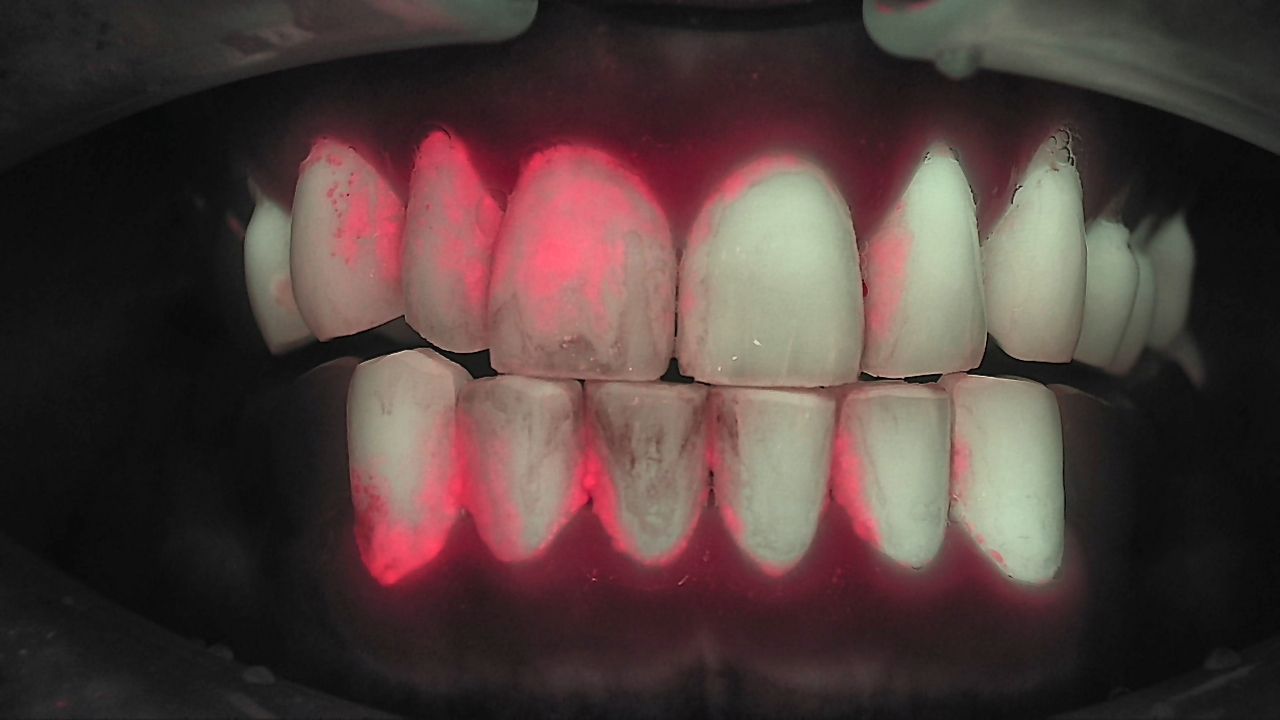
After you show, ask before you explain. "What do you see?" turns the patient from a passive listener into an observer. People tend to trust their own conclusions more than someone else's. Giving the patient time to discover the problem before you explain it is the core of step 1. Some educators call the instant a patient first sees their own image the moment of truth, the point where behavior change can begin.
More images make the conversation easier. With several images on screen, it is simpler to talk while looking, and patients often start asking their own questions. In one clinical case, the clinician marked contacts with articulating paper, then took a Qray fluorescence image. Where the contact marks and a crack line lined up, a single drawn line on the screen was enough for the patient to follow the explanation.
Showing what is not a problem is part of step 1, too. A patient worried that an old filling had "gone black" can see that there is no red fluorescence at that site, and hear that the dark shade is the restoration showing through thin tooth structure. Then you point to the areas that do need attention. Showing plainly what is and is not caries builds trust. The clinical decision always stays with the dentist, alongside other findings.
There is research suggesting that seeing your own plaque can lead to changed habits. One study randomly assigned school adolescents to two groups. One group received additional education and plaque removal training while checking their own plaque with a portable QLF-based device. After eight weeks, that group showed better plaque index scores and better oral health knowledge, attitude and behavior scores than the group taught the conventional way. It was a school program, not a dental office consultation, so the result does not transfer directly. It does support the idea that seeing is a reasonable place to start.
Step 2, Explain: if not symptoms, what do you explain?
Center the explanation on cause and time, not symptoms. Disease does not appear overnight. It has a course. Step 2 explains how this happened, in order: biofilm sat for a long time where the brush does not reach, and change began at that site. The tone is shared understanding, not blame.
If there is a prior record, set the images side by side. If not, today becomes the baseline. In one clinical case, a regular recall patient's hygiene status was assessed and then re-imaged under the same conditions four months later. Displayed left and right, the change in the patient's habits after education was visible, and the patient could see their own progress. Remember that a different date does not mean the same conditions. Confirm the same site, angle and light source, and separate the difference you observed from your interpretation of why it happened.
Keep observation, interpretation and options distinct. "There is an area that looks red here" is the observation. "That looks like a spot where plaque has stayed a long time" is the interpretation. "We can adjust your home care and look again next visit, or discuss treatment if needed" is the set of options. Do not imply that an asymptomatic change means disease or immediate treatment, and avoid phrases like "hidden disease" that push a decision through fear. Fluorescence images are information you read together with radiographs and clinical findings. Each exam shows different information for a different purpose, and patients deserve to hear that.
Step 3, Simulate: how far can a simulation go?
A simulation is a starting point for discussion, not a promise. Insight Smile's projected images give the patient and clinician a shared reference for goals and priorities. They help you pin down what the patient actually wants and explain the gap between what is clinically achievable and what the screen shows. Keep the original photo, the projected image and the post-treatment photo clearly separate, and label the projection as a virtual image every time.
Say "results can differ" first. The final outcome depends on occlusion, reduction, examinations and clinical conditions. Saying this before the image appears changes its role: it is no longer a picture that inflates expectations but a tool for agreeing on direction. Some clinicians show two or three options side by side, settle on a general direction with the patient, and share the chosen image with the lab.
Show the process, not just the final smile. In one clinical case, a patient could not follow a verbal explanation of the occlusal plane. The clinician then walked through projected images step by step: which tooth would be adjusted and how, how the gingival line and the posterior plane would change. The patient came to understand why the full treatment plan was needed. The images showed the road the treatment would travel, not just the destination.
Not every patient needs step 3. A hygiene consultation rarely calls for an esthetic simulation. Use it only for relevant patients and for the purpose of that consultation. A conversation that ends after steps 1 and 2 with an agreed care plan is a complete storytelling consultation.
What changes when the three steps connect?
The goal of the consultation shifts from persuading to understanding, confirming and participating. In one clinical case, a patient arrived frustrated about multiple restorations and inflammation in the anterior region. The first thing the clinician did was show a Qray fluorescence image. Seeing the red fluorescence, the patient began asking questions. The clinician then explained how home care and occlusal changes had contributed, and showed the treatment sequence through step-by-step projected images. Within a day, the patient understood the overall plan and chose to proceed. This is one case and does not guarantee the same result for others.
| Point of comparison | Verdict-first presentation | Storytelling consultation |
|---|---|---|
| Opening line | "You have a cavity and need treatment." | "Here's the area we want to look at. What do you see?" |
| Patient's role | Listens, then says yes or no | Looks, asks, decides together with the team |
| Evidence | The clinician's word and experience | Today's images, comparison with prior records, other exam findings |
| The future | Outcome described in words | When relevant, the process shown in projected images, with the note that results can differ |
| End of the visit | Treatment is scheduled, or the conversation stops | Even without a decision, a care plan and a next check date remain |
A visit without a treatment decision is not a failed consultation. Plenty of patients understand the problem and still wait because of cost or schedule. If you agree on what to watch and when to look again, the next visit becomes a commitment with a reason, not a generic recall card. Respecting the patient's choices and questions is the posture behind this method.
It works best as a team conversation. When the hygienist handles imaging and the first "What do you see?", and the dentist handles cause and treatment options, the flow of the day is not interrupted. If the whole team shares the same images and the same order, the story continues no matter who is talking.
What's next
The images and explanations from the consultation are recorded in LINKDENS, and the outcome and relevant educational material can be summarized in a report sent to the patient. At home, the patient can revisit the conversation and remember the plan. At the next visit, the same area is imaged under the same conditions and placed beside the last image, so step 2 opens with "here is what changed." For a practice owner, the storytelling method turns a single imaging session into the basis for patient explanation and ongoing care. It does not guarantee return visits or acceptance rates. When the consultation is documented and leads to the next check, that is where continuous care through QBLISScare begins.
FAQ
Q. Will the storytelling method improve dental case acceptance?
A. No one can promise that. Acceptance also depends on cost, patient preference and clinical conditions. The aim is to help patients choose with a real understanding of their own condition, and the results are something each practice confirms in its own operations.
Q. Do I need to show a simulation to every patient?
A. No. Steps 1 and 2 are enough for many conversations, such as hygiene consultations. Use simulation for relevant patients, such as esthetic or restorative cases, and always with the explanation that it is a virtual image and results can differ.
Q. Won't patient education take too much chair time?
A. It can feel long at first. Splitting roles helps: the hygienist captures images and asks the first question, the dentist explains cause and options. A fixed order for reviewing images keeps the conversation short and consistent, and as records accumulate, step 2 becomes a quick "compared with last time."
References
- Khudanov B, Jung HI, Kahharova D, et al. Effect of an oral health education program based on the use of quantitative light-induced fluorescence technology in Uzbekistan adolescents. Photodiagnosis Photodyn Ther. 2018;21:379-384. DOI