
Residual Caries: Image the Cavity Once More Before Restoring
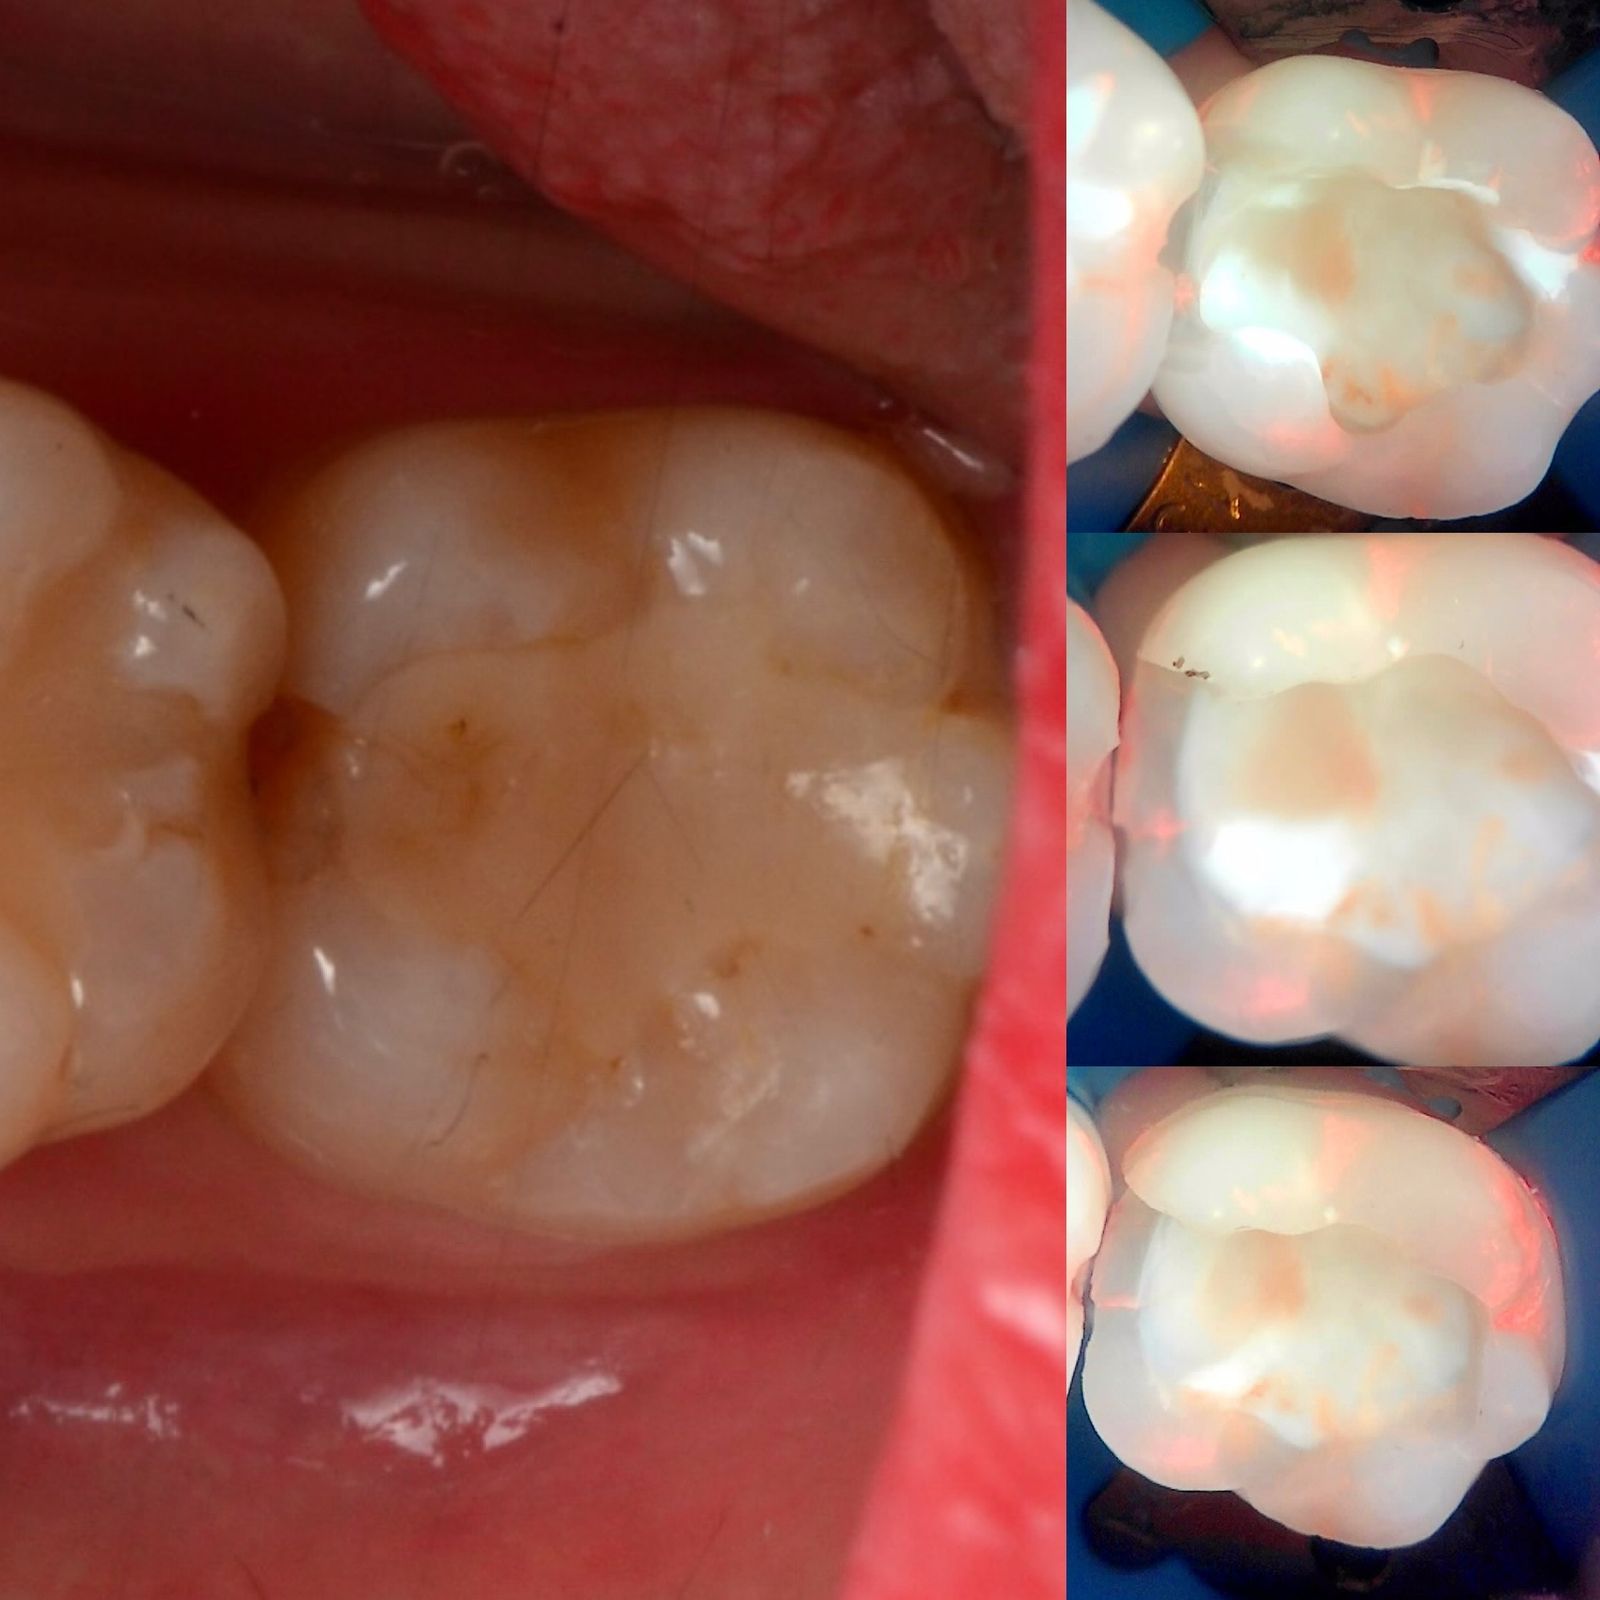
Residual caries is a question of endpoints. When does caries removal stop? Most of us stop when the cavity looks clean and feels hard. Yet a Qray fluorescence image taken mid-procedure sometimes shows a patch of dentin that looks clean but glows red. And the reverse happens too: dentin that is dark and discolored but shows no red fluorescence, and is left in place. This article revisits how we decide the caries removal endpoint, what fluorescence-aided caries excavation adds, and the chairside order practices use, with a real case and two published case reports.
How are you deciding the caries removal endpoint today?
The traditional criteria are the eye and the explorer. Has the color returned to normal, does the dentin feel hard, and if in doubt, does a caries-detecting dye stain it? Some operatories add a microscope. Each method has merits and the same two limits: the endpoint differs from clinician to clinician, and the judgment of that moment leaves no record.
The more you lean on selective or stepwise caries removal, the more you need a way to confirm what you left. How far to excavate affected dentin near the pulp is a constant question. A treatment that deliberately leaves dentin behind makes it more important to document what stayed and what to re-check next time. A fluorescence image of the cavity can support that confirmation.
What does red fluorescence inside the cavity mean?
Red fluorescence comes from porphyrins, bacterial metabolites, and appears in dentin where bacteria have lived. If the cavity still shows red after excavation, the first suspicion is infected dentin left behind. In one clinical discussion, a core composite looked red and the clinician asked whether the material was the cause. The more likely explanation offered was residual caries beneath, and the deciding question became whether hard dentin had been confirmed before the core was placed.
Red does not always mean remove, and dark does not always mean caries. Red fluorescence needs time to develop after bacteria settle, so freshly exposed dentin may not glow. Conversely, dark discolored dentin without red may not be active caries. Imaging over biofilm can exaggerate the lesion, so read the cavity after plaque is cleared. The endpoint is set by the clinician using color, hardness, radiographs and the fluorescence image together.
Composite has fluorescence of its own. Nanofilled composites appear bright under Qray fluorescence, which exposes overfill and voids. When reading red under a restoration, separate material fluorescence from the red of caries.
| Method | What it shows | Strength | Limit |
|---|---|---|---|
| Visual and tactile | Color, hardness | Immediate, no extra device | Operator-dependent, no record |
| Caries-detecting dye | Stained dentin | Visible boundary | Can stain sound dentin, risk of over-excavation |
| Qray fluorescence image | Red fluorescence in bacteria-exposed dentin | No staining, the image is the record | Recent lesions may not glow, material fluorescence must be distinguished |
What the case reports showed
One case report used fluorescence to guide stepwise removal of dentin caries under an inlay. A patient with mild pain on chewing had the old restoration and caries removed by visual and tactile methods first. An image of the cavity then showed strong red fluorescence in the suspected area. The red dentin was removed in steps until it was almost invisible, confirmed with another image, and the tooth was restored conventionally. Nine months later the patient reported no pain or discomfort. The authors concluded that QLF technology can provide evidence for determining the extent of caries removal non-invasively.
Another case report went minimally invasive because there was no red. After a fractured restoration and caries were removed, the clinician saw dark discolored dentin and a crack line, but no red fluorescence. Combined with other examinations, the decision was a crown without endodontic treatment, and the tooth was functioning well at 12 months. In the same report, a different patient's cavity findings, together with symptoms and radiographs, led to endodontic treatment instead. In both patients the authors state that the decision combined visual, tactile and radiographic findings with the fluorescence image. These are case reports and cannot be generalized.
A real case: imaging while the composite comes out
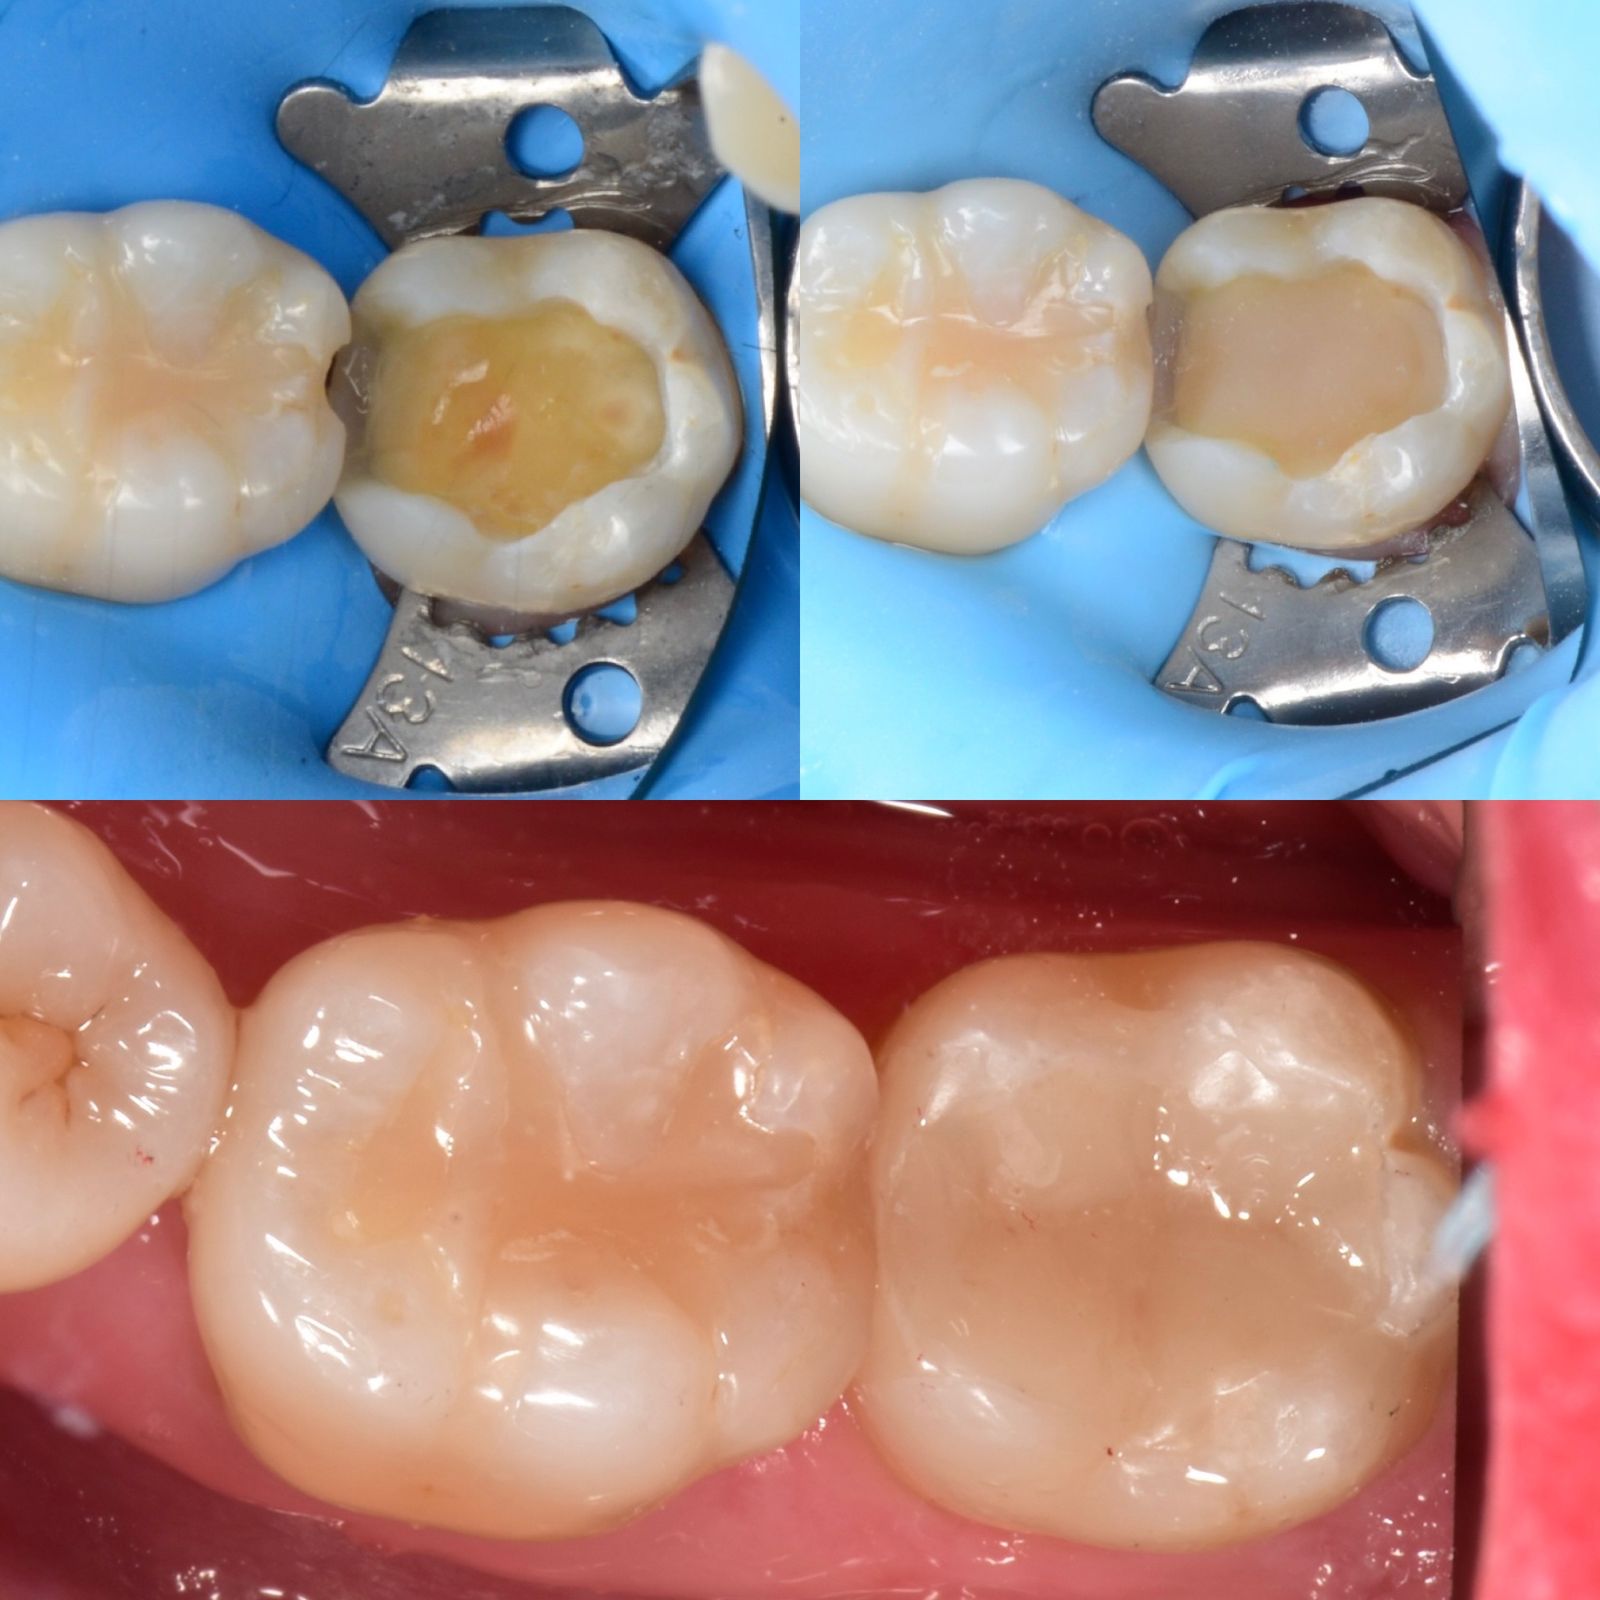
Secondary caries at the proximal margin of a large restoration. White light shows marginal staining and a gap. The Qray fluorescence images taken while the composite was being removed show red fluorescence along the inner margin of the cavity. The red sites were checked, composite and caries were removed carefully, and the tooth was finished with a ceramic inlay. The step-by-step images show exactly what was left and how far the cavity was cleaned.
A mid-procedure image shows more than caries. Composite left behind when an old filling is removed, cement remaining in a canal after post removal, and cement and subgingival calculus on a tooth that lost its inlay all appear in one frame. One clinician photographed a cavity to check for leftover composite and still missed a clearly visible remnant on the distal, then wrote a note that taking the image matters less than actually looking at it. The habit of looking at the image before restoring is as important as the habit of taking it.
A chairside sequence
- Before treatment: white light and Qray fluorescence of the restoration margin and suspicious area.
- Remove the old restoration and caries by visual and tactile methods.
- Image the cavity under Qray fluorescence and check for red sites, leftover composite, cement and calculus.
- Re-examine the red sites and decide on further removal with color, hardness and radiographic findings.
- One more image immediately before restoring, as the record.
- One image after restoring, to check overfill, voids and the margin.
For caries, shoot close and bright. Red fluorescence inside a cavity rises from depth, so hold Qraypen C as close as the range allows at the default brightness, shield ambient light with your free hand, and have an assistant blow air to clear fog. Under rubber dam, saliva and bleeding interfere less. Capture basics are covered in Intraoral Fluorescence Photography: Four Repeatable Basics.
What's next
The two images, before and after cleaning, are stored in LINKDENS and delivered to the patient as a report. In one clinical account, showing the pair right after treatment produced surprise and then relief on the patient's face, and the next tooth was booked before leaving. For the practice owner, a cavity image is quality control for the restoration and an explanation of why that much was removed. It does not guarantee a return visit or case acceptance. It does leave the procedure on record, so the same tooth can be re-checked at the next visit, which is where continuous care through QBLISScare begins.
FAQ
Q. Can the caries removal endpoint be set by red fluorescence alone?
A. No. Red fluorescence is information about where bacteria have lived and supports the check. The endpoint is set by the clinician using color, hardness and radiographs together. The published case reports describe combined decisions.
Q. In fluorescence-aided caries excavation, what if the dentin under a composite looks red?
A. First ask whether it is material fluorescence and whether hard dentin was confirmed before the composite was placed. An image taken right after excavation makes this easy. Monitoring symptoms and re-checking at the next visit is also an option.
Q. When do you image the cavity?
A. After the first pass of removal and immediately before restoring, as the baseline. One more image after restoring records overfill and the margin.
References
- Lee JW, Lee ES, Kim BI. Optical diagnosis of dentin caries lesions using quantitative light-induced fluorescence technology. Photodiagnosis Photodyn Ther. 2018;23:68-70. DOI
- Lee JW, Lee ES, Kim BI. Can red fluorescence be useful in diagnostic decision making of residual dentin caries? Photodiagnosis Photodyn Ther. 2019;26:43-44. DOI