
Plaque Before and After Scaling: Show the Red Disappear
Plaque before and after scaling is one of the easiest things to show a patient, and one of the most often skipped. After a prophy, most patients say their teeth feel smooth, but they never see what came off, or which spots they should focus on before the next recall. Take one Qray fluorescence image before and one after, and the conversation changes. The red that was glowing along the margins is visibly reduced, and whatever red remains becomes the next care target on its own. This post covers what the two images show, why the "before" capture matters most, and a chairside order that works.
What changes between the before and after images?
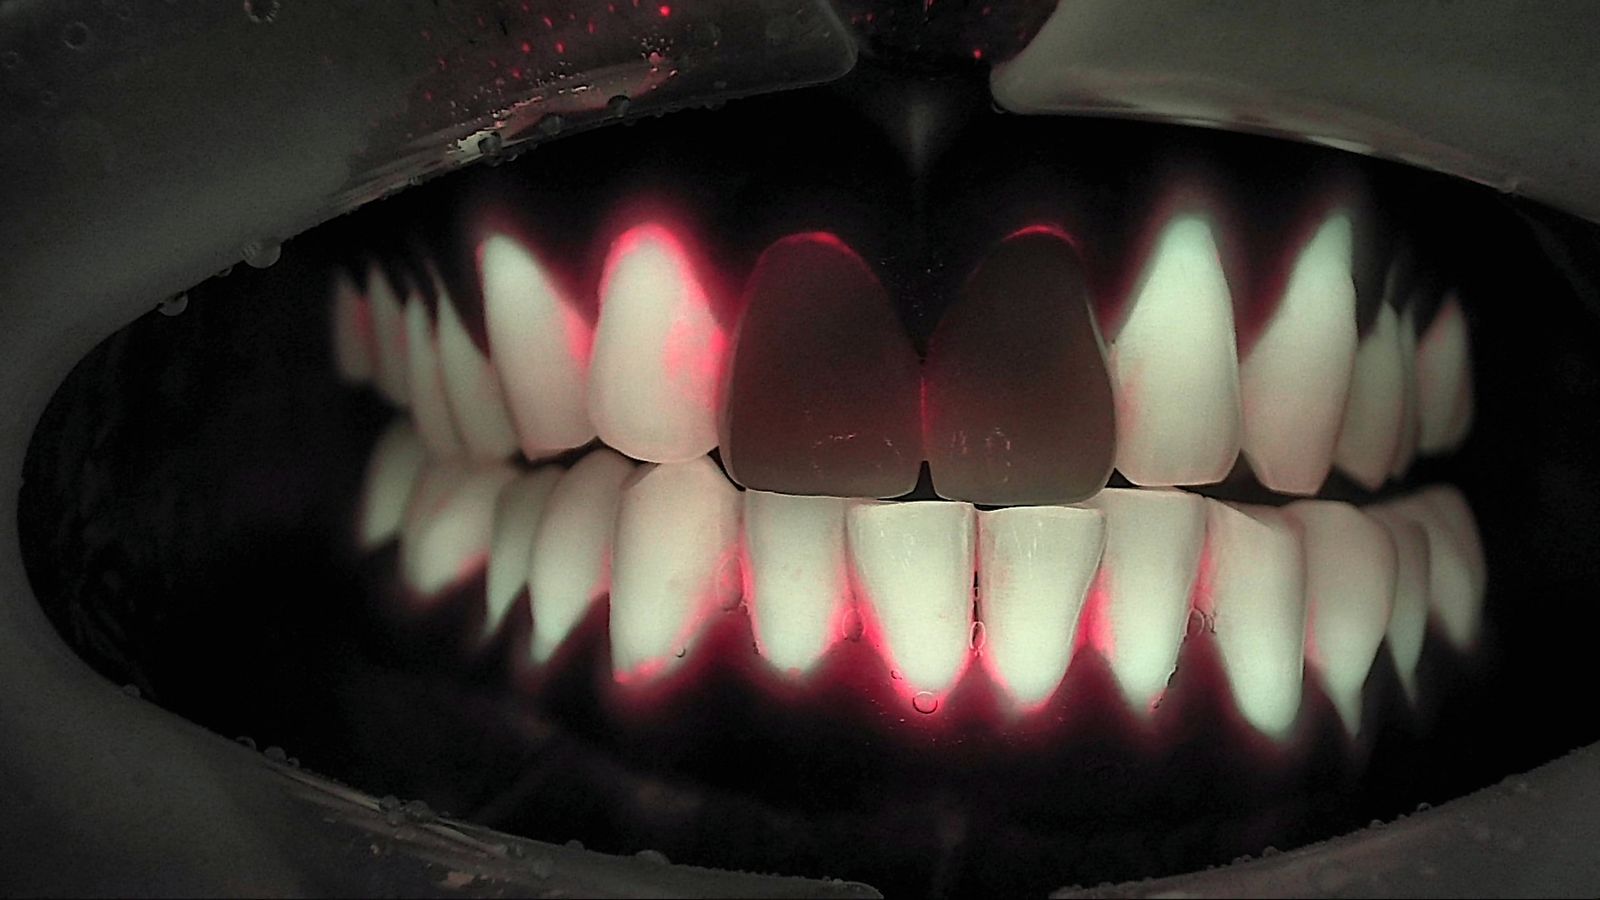
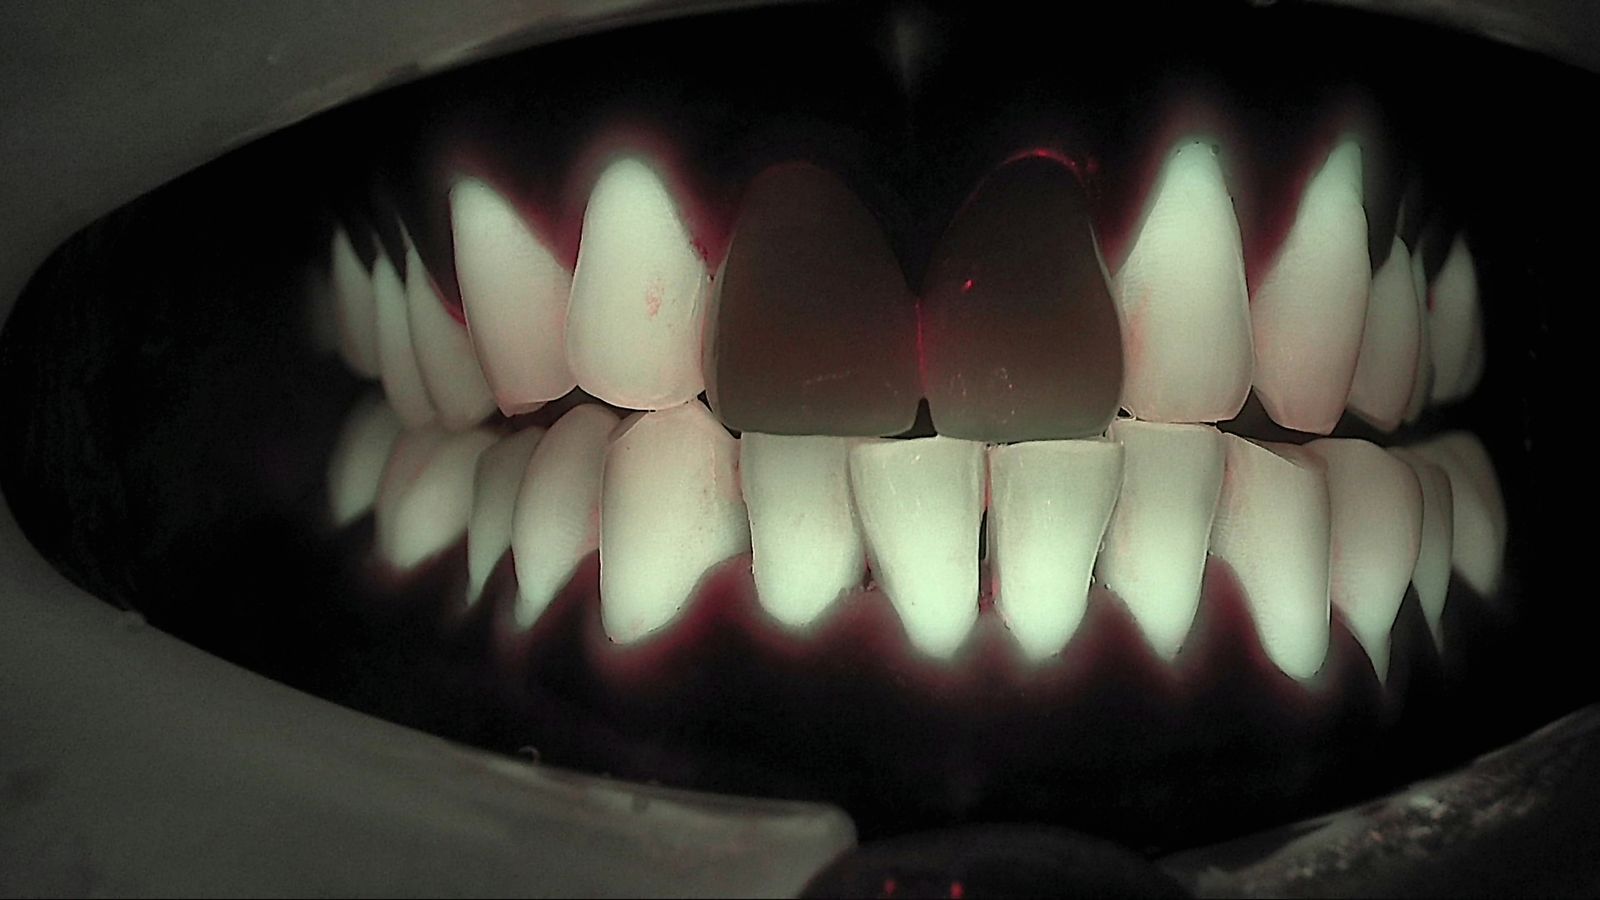
Two images that look similar under white light look very different under Qray fluorescence. The case below shows the same patient's anterior teeth, front view, before and after scaling. Under white light, even the "before" image doesn't show much visible deposit. Under Qray fluorescence, though, red runs along the cervical margins and interproximal areas of the lower incisors and along the margins of the upper lateral incisor and canine. In the "after" image, taken from the same angle, the red along the lower cervical margins is noticeably reduced.
Red fluorescence is a signal of mature biofilm. In a clinical study of 69 participants, an automated plaque index calculated from fluorescence images alone, without any disclosing agent, correlated highly with the plaque index for mature plaque stained blue by a two-tone disclosing agent (r = 0.78) (Park et al., Photodiagnosis Photodyn Ther 2020). An earlier study concluded that fluorescence-based plaque assessment was a clinically acceptable way to detect mature plaque (Han et al., Photodiagnosis Photodyn Ther 2016). For why plaque glows red in the first place, see Dental Plaque Fluorescence: Why Mature Biofilm Glows Red.
The two dark upper central incisors are restorations. Restorative materials fluoresce differently from natural teeth, and they look the same before and after. Leave them out of the comparison and talk about the natural teeth.
Why capture before scaling, not just after?
The "before" image is where the explanation starts. With front and lateral views captured before the prophy, the hygienist can point to the screen and say "this is where the calculus and biofilm are, and this is how much." In one clinical case, every recall patient is photographed before scaling as a standing routine: the hygienist captures and explains, and the dentist reviews the images at the end and confirms the findings.
Some information only shows up before you clean. Lateral views are good for cervical wear and cervical caries, and comparing before and after biofilm removal can reveal a lesion or crack nobody had noticed. In one clinical case, a patient who came in "just for a cleaning" asked about the red fluorescence under their anterior veneers, which led to periodontal therapy first and a conversation about redoing the veneers later.
It's also a practical alternative to disclosing agents. You can show plaque that's still there after the patient brushed at home, without staining, which makes it useful for oral hygiene instruction when disclosing isn't convenient.
| What you're comparing | Disclosing agent | Qray fluorescence image |
|---|---|---|
| Setup | Apply, then rinse | Capture only, no staining |
| What you see | All plaque stains (two-tone agents color mature plaque differently) | Mature biofilm shows as red fluorescence |
| Before/after the same day | Residual stain makes a second look harder | Recapture from the same angle and put both side by side |
| Record | Needs a separate photo | The capture is the record |
How do you turn plaque removal verification into a visible target?
"Brush better" sounds like a grade, not a goal. Here's the same message with an image: "This red area is where biofilm has been sitting for a while. We cleared it today. Next time you're in, let's see how this spot looks." The reason for the recommendation comes through without blaming the patient, and the patient knows exactly where to focus.
Where the red sits tells you about brushing habits. Which side gets brushed well varies from person to person. In one clinical case, the clinician expected the pattern typical of a right-handed patient, saw the opposite in the images, and adjusted the brushing instructions. The images let you talk about this patient's actual pattern instead of a guess.
You also see the spots that keep collecting deposits because of alignment. In a patient with anterior crowding, plaque and calculus tend to build up in the same places. Showing before and after together makes it easier for the patient to understand why that area needs extra attention.
The "after" image is a baseline, not a report card. It's fine if not all the red disappears. Whatever remains becomes the next care target, and the reference point for a recapture at the next recall, from the same site, angle, and light source.
What's the chairside order for dental prophylaxis imaging?
Before/after capture is the reassessment step of Red Biofilm Care. In a single-visit flow of "screen first, clean thoroughly, then diagnose precisely," comparing before and after confirms what you did today and leaves a record for the next visit.
- Before scaling, capture front and both lateral views in white light and Qray fluorescence.
- Put the images up and point to the red to show where calculus and biofilm are.
- Scale and remove biofilm.
- Recapture the same sites from the same angle with the same light, and put before and after side by side.
- Set the remaining red as the next target, review brushing technique, and agree on when you'll look again.
It feels like extra work at first, then it becomes the system. When the hygienist handles capture and explanation and the dentist confirms at the end, you get before and after images at every recall without stretching the appointment much. Red fluorescence alone doesn't mean treatment is needed; for a precise diagnosis, read the functional information from fluorescence together with the structural information from radiographs. Qray fluorescence complements radiographs, it doesn't replace them.
A second real case
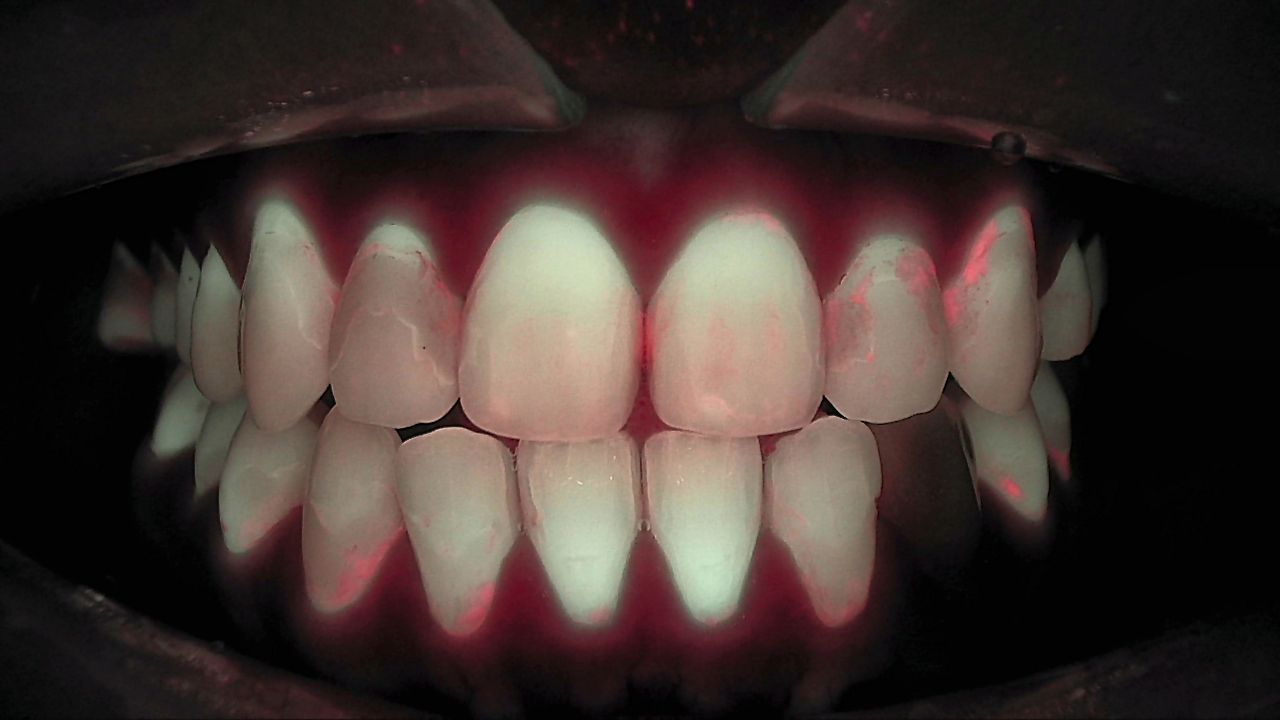
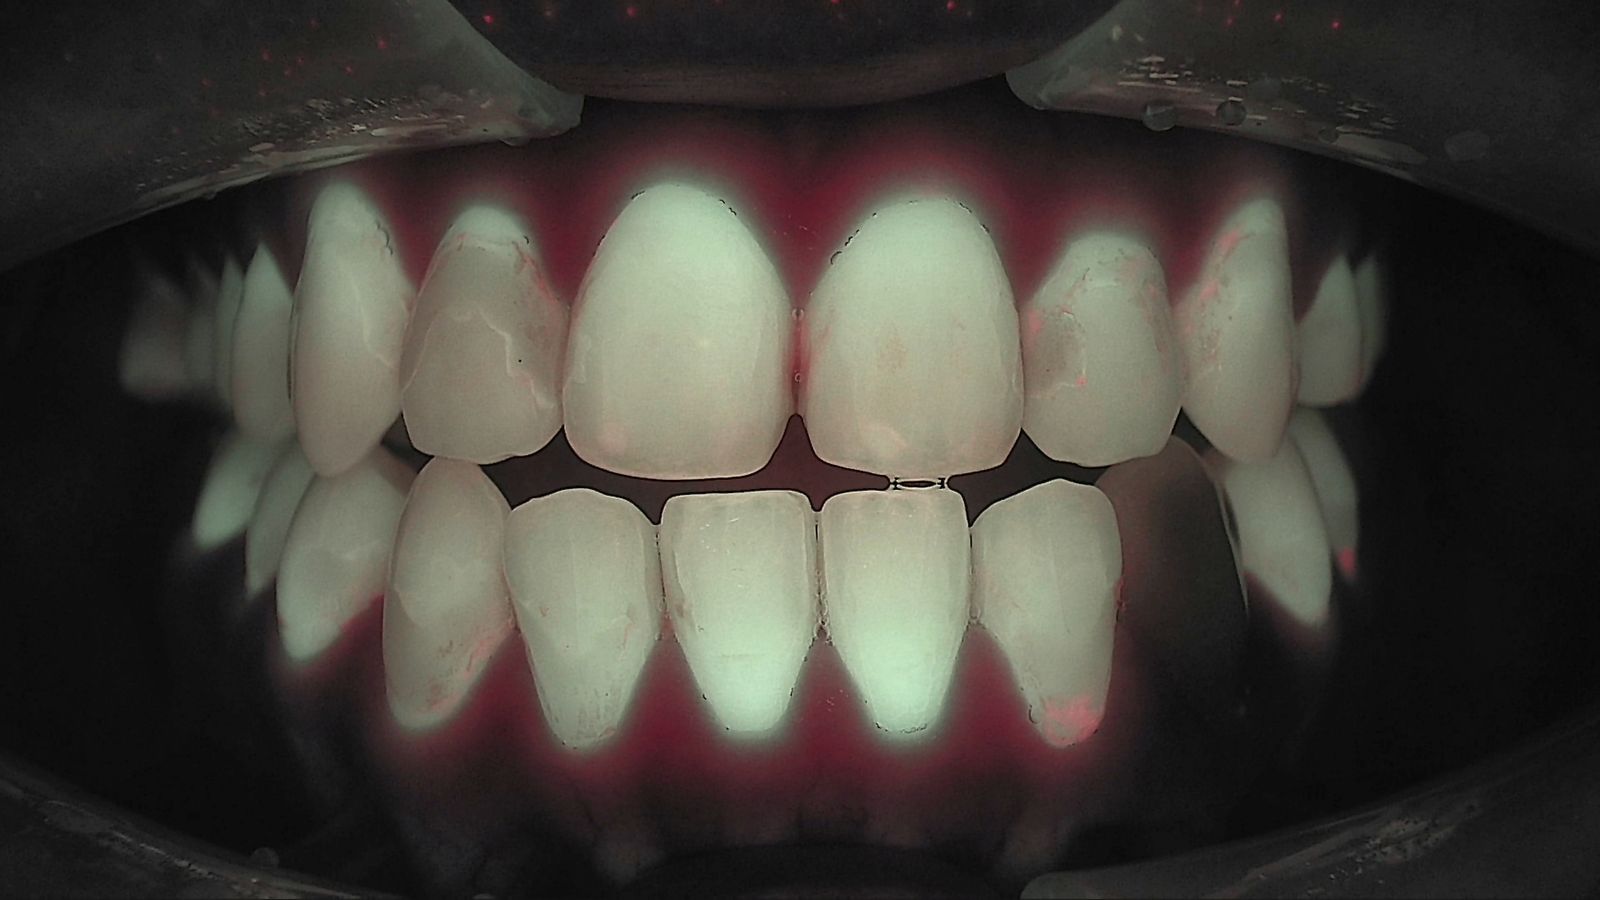
At the initial visit, red fluorescence shows on the upper lateral incisor and canine and at several lower cervical sites. After scaling, the teeth look evenly green-white, with red left only as thin lines on the lateral incisor and canine surfaces and part of the lower canine's cervical area. The two images differ slightly in distance and angle, so the explanation focused on where the red was rather than how much. The remaining spots became the targets to recheck from the same angle next visit.
What's next
Before and after images go into LINKDENS and can reach the patient as a report, so you can pull up the same sites and compare them at the next recall. For a practice owner, that's the point where a single prophy turns into a care commitment: "let's check this spot together next time." No one can guarantee more rebooking or higher case acceptance, but what the patient is coming back to check is now clear and visible. As those comparisons continue visit after visit and carry into continuous care through QBLISScare, scaling stops being a one-off procedure and becomes one step in ongoing care.
FAQ
Q. What's the benefit of showing plaque before and after scaling?
A. Patients see what was removed and understand the remaining spots as their next target. Oral hygiene instruction can be based on this patient's own images rather than general advice.
Q. Do I need fluorescence for plaque removal verification?
A. No. Disclosing agents and visual inspection work too. Qray fluorescence shows mature biofilm in red without staining, and makes it easy to recapture from the same angle and keep a record.
Q. If red fluorescence remains after a dental prophylaxis, is something wrong?
A. Not necessarily. Treat remaining red as the next care target, and if needed, the dentist evaluates it together with other exams. Recapture under the same conditions at the next visit and compare.
References
- Park SW, Kahharova D, Lee JY, et al. Clinical assessment of an automated fluorescent plaque index scoring with quantitative light-induced fluorescence. Photodiagnosis Photodyn Ther. 2020;32:102011. DOI
- Han SY, Kim BR, Ko HY, et al. Assessing the use of Quantitative Light-induced Fluorescence-Digital as a clinical plaque assessment. Photodiagnosis Photodyn Ther. 2016;13:34-39. DOI